Limestone cut-offs, a granite countertop, and recycled unit pavers all come together to create a mini outdoor kitchen with a pergola, fireplace and fountain

Photo of the finished result looking from the back door of the house, from a high vantage point. A small pile of limestone still remains behind the fountain waiting for another project
The fountain was added during the following season
Most of the cost incurred for this build was just for the stain, posts, pavers, BBQ and the sand & gravel
This project was the 3rd one to be completed and was done the following summer after the deck (Phase 1) was built and functional. It turned out to be the right decision to wait until the following year as this was a lot of work, but also took the most time to source the material. I think it turned out pretty well overall, considering the fact that all major components were sourced in different locations at different times, and in particular the pavers were somewhat of a compromise since I never ended up finding (in the used marketplace) what I originally had in mind.
I found the limestone blocks through Kijiji Free Stuff and it was local, less than 10 miles away. These were cutoffs of Blue Mountain limestone used as exterior cladding for a new home build in one of the wealthier parts of town. The typical brick was about 7 to 8 inches wide and 11.5 inches tall but there were a variety of sizes and shapes. The granite countertop is 7 feet long and was found in the north section of Gatineau. The beige pavers were found near Metcalfe; the dark grey ones a few miles from my home here in Orleans. The BBQ was sourced from Barrhaven (of course) and the sink was from South Keys. The Greater Ottawa area is well represented here.
Some of the smaller piecework was done slowly over the course of a few months but the majority of the heavy lifting (there was lots) was done over a three week “vacation” break. The general procurement breakdown was about 50% of the materials obtained for free, about 15% of the materials purchased new (stain, vertical posts and the granular A and sand were the bigger ticket items), and about 35% purchased used. The free material included all the limestone blocks and the countertop, and all the lumber except for the posts. All the conduit material was also obtained free, and even the sink and all plumbing pipes and hoses were freecycle.
This page shows the build process from start to finish and details how I designed the space, where I sourced the material, and some of the features I designed into the finished product.
FREECYCLE TOOLS USED:
- Electric Drill
- Skill Saw
- Belt Sander
- Shovels and pitchfork
- Wheelbarrow
BORROWED:
- Hand Auger for post installation and for some drainage pipe work
- Hand Tamper and 2nd wheelbarrow
- “The Chopper”, a gas powered masonry chop saw
RENTED:
- Gas Powered Vibrating Plate Compactor
PURCHASED NEW:
- Outdoor all-in-one Electrical Box ($10)
- Natural Gas hose and Fittings ($60)
- Two 6″x 6″ twelve foot posts ($50)
- Stain ($180, 4 for price of 2 sale)
- Cedar bark chips ($20)
- Gravel and Sand ($350)
- Portland cement and fibreglass additives ($30)
- Metal Art ($90)
- Two 4″x 4″ twelve foot posts ($30)
- Outdoor receptacle ($12)
- Propane unit ($50, on sale)
PURCHASED USED :
- 2 year old, super clean, Natural Gas BBQ ($400)
- 200 sq. ft. of Beige Pavers ($300)
- 80 sq. ft. of Dark Grey Pavers ($150)
FREEBIES:
- Granite Countertop with oversize sink cutout
- Garden hose; Y-splitter
- Stainless Steel double sink with taps, sprayer & hardware
- Limestone Cladding cut-offs, various cut sizes all 3.5″ thick
- 2″ PVC drain pipe and miscellaneous elbows, fittings, etc for sink drainage (Kijiji/ local scrap)
- Marble end caps for BBQ station walls
- Miscellaneous lumber for pergola roof (Kijiji/Freeycle.org)
- Electrical wiring (outdoor grade)
- Various sizes and lengths of conduit (construction scrap)
- 4″ Perforated and 4″ solid drainage pipe (Kijiji)
- Riverstone and limestone (neighborhood leftovers from their landscaping jobs)
- Fountain pump and plumbing bits
- Flashing for propane surround
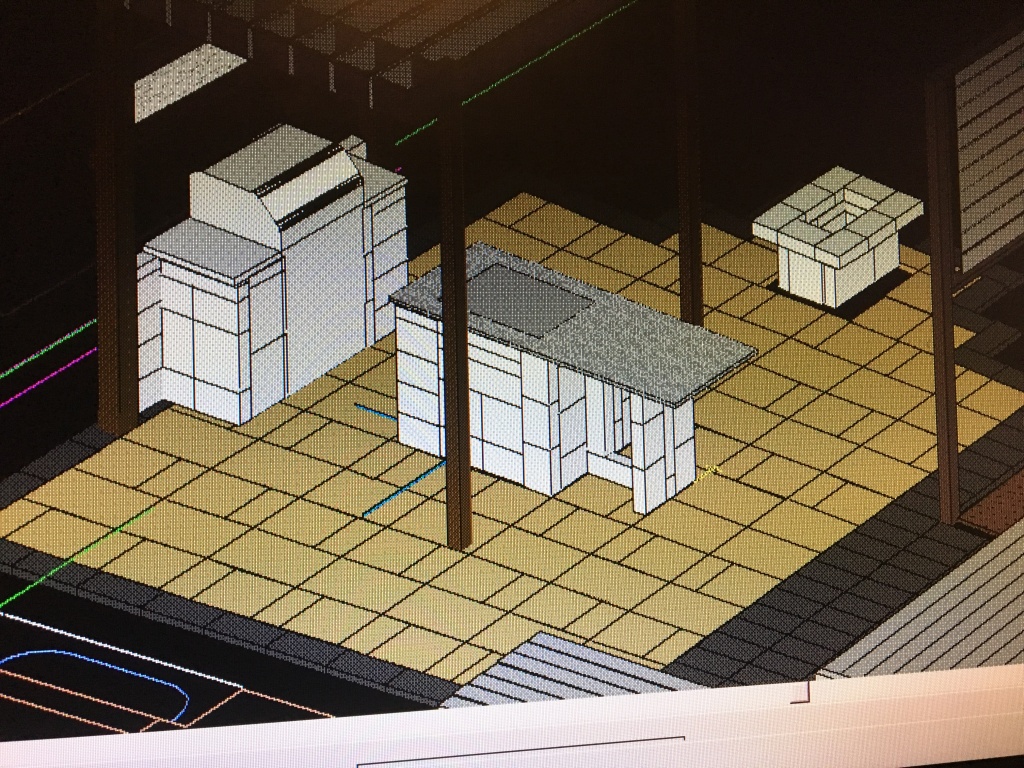
This photo shows the design concept that I ultimately chose for Phase 2 – the outdoor kitchen and patio. I had about 5 different designs I developed in CAD but this one made the most sense to me, and it had a very symmetrical, zen layout. One tough thing about doing these upcycle projects is the process of designing and building is different. Typical DIYer’s can plan it all out first and then buy everything new. But freecyclers and upcyclers need to see what they can find first and then figure out what they can build from whatever they find. The dark grey and beige (paver stones), white (limestone blocks) and grey (countertop) represent what I was able to procure, arranged in 3D CAD. Designing in this way is like playing with virtual Lego, where you input CAD elements of what you found and you then try to see the best way to use it all up.

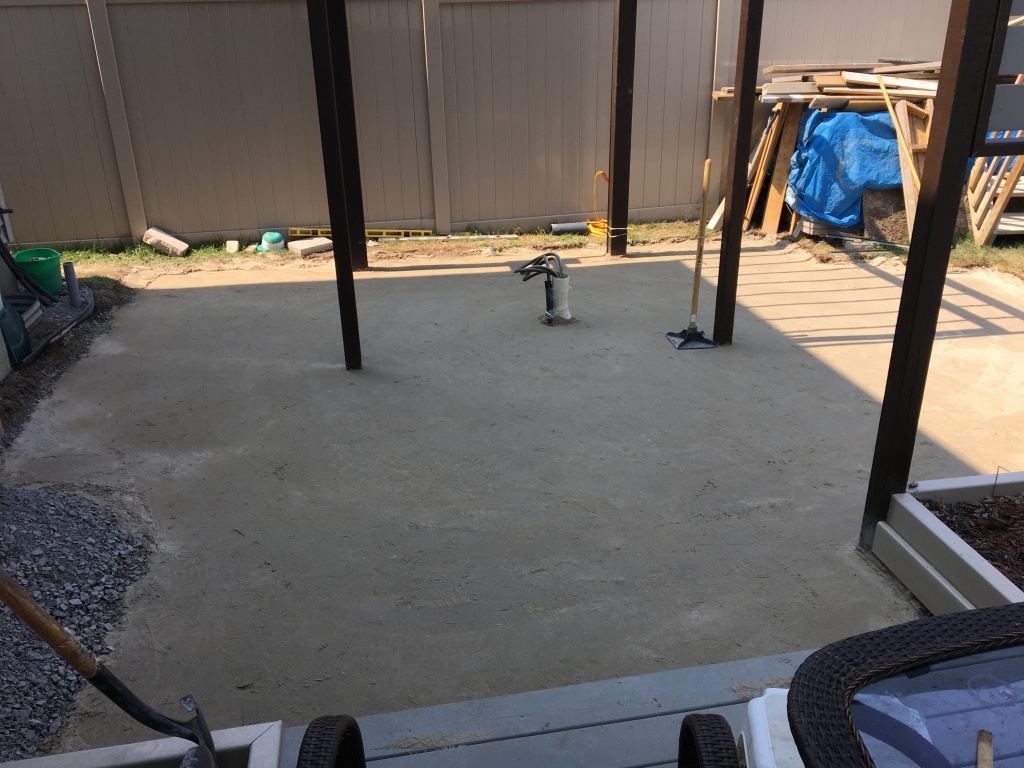
The work begins. The excavation was all done 100% by hand shoveling. The depth of clay removal was about 14″ down from the surface across a 280 sq ft layout, plus even deeper excavations trenches for the conduits. A pitchfork (by the stairs) was needed to breakout a lot of the clay as it was very stiff. That is a big pile of clay in the foreground ready for loading. Two wheelbarrows were used in tandem to load all material into a small 5′ x 8′ box trailer to haul away. Kijiji allowed me to find people within a reasonable distance who were looking to receive general purpose fill. I think we ended up hauling out 16 trailer loads of just under 1 ton each. To say this was a lot of manual labor for a couple of weekend warriors is an understatement, but again this is not a hobby for the lazy. Like Yoda says, “There is no try, there is only do, or do not.”
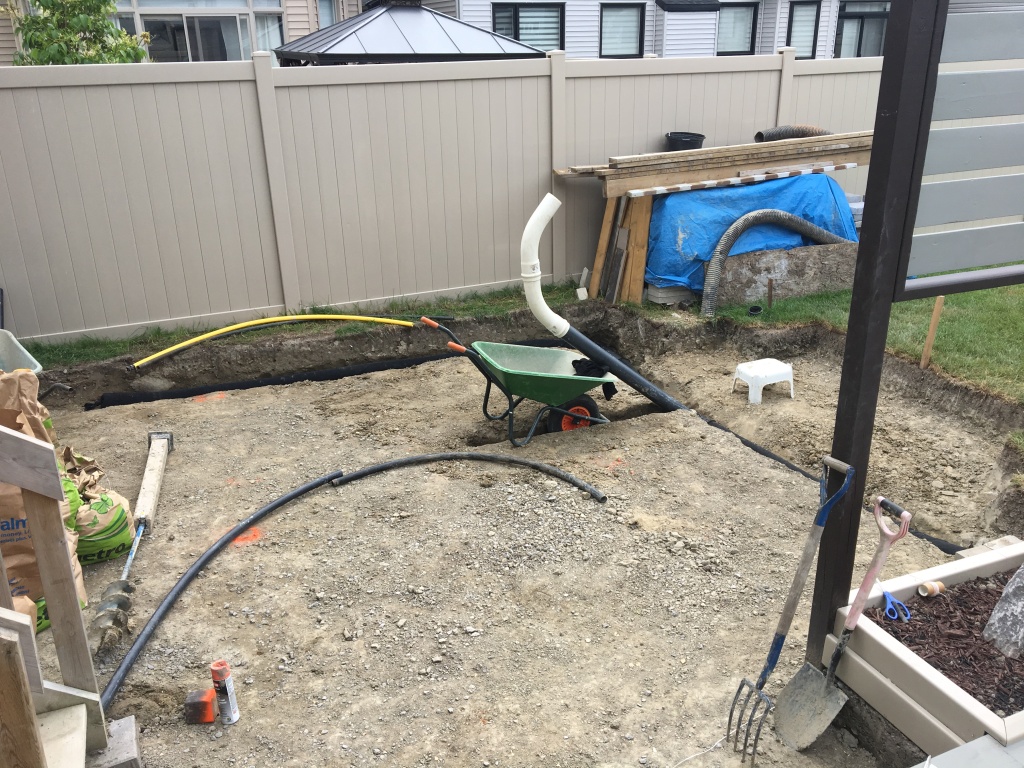
The plan included the need for several conduits in order to carry the services needed for the kitchen island (water, wastewater), barbeque (natural gas line) and outlet (electrical). Perimeter perforated pipe would also be installed to aid in drainage. In this photo some of these elements can be seen starting to be laid out to go in their respective trenches. The black conduit will house the water service; the yellow-spliced to orange one will be for the electrical box. Another conduit, not shown, will house the natural gas line to the BBQ. Note that the freecycle extension on the auger needed to drill down below the frost line……
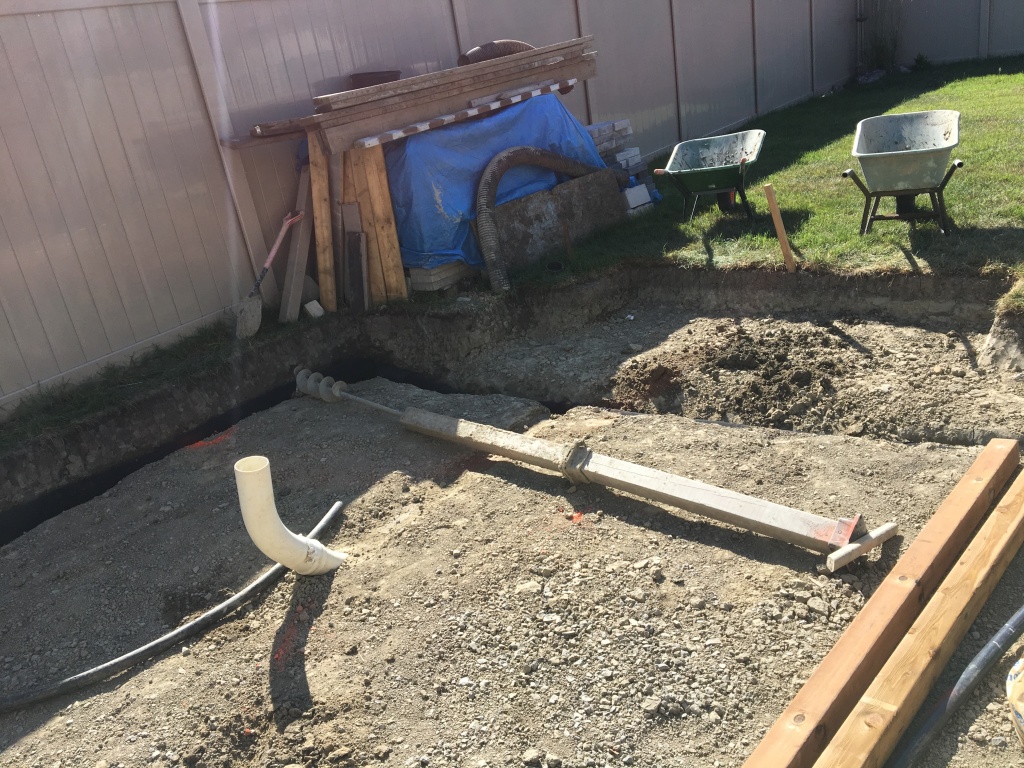
….gets extended even further to allow a hole deep enough to get down to the granular weeping bed that runs along the house perimeter at the basement floor level, allowing perimeter drainage to go down below the impervious clay. Two four-foot posts with footings, bolted together back to back, combined with a handle on a 3rd footing mounted to the top allowed augering down to a depth of over 10 feet with a hole large enough to accommodate the 4″ flexpipe, a portion of which is seen in the background against the limestone stack covered by the blue tarp.

The limestone itself was procured as freecycle material that was offered up on Kijiji Free Stuff. It was a large amount of Blue Mountain limestone cut-offs from a contractor’s build in the Glebe and filled two trailer loads plus quite a bit in the SUV. Most of the blocks were a fairly consistent size of 11.5″ high by anywhere from 7″ to 9″ wide; all blocks were 3.5″ thick. Others were longer (almost 24″) but narrower pieces. I had enough to do the layout shown in the CAD rendering, plus enough left over for a freecycle fountain. Beautiful stone that was just too nice to be thrown in a landfill; it was a great find that I was happy to put to good use.

Another great find was this granite countertop that if I recall correctly was also was offered up on Kijiji Free Stuff, located across the river in Gatineau. This is a lousy picture of it being stored in my garage under my trailer face down, but it was in good shape and happened to be an amazingly fortunate color match with the limestone. It had a large sink cutout at one end, but at 7′ long, 3/4″ thick and 32″ wide it was still one heavy piece and had to be handled carefully. It laid safely on a carpet under my trailer in the garage for almost 2 years before it was installed.

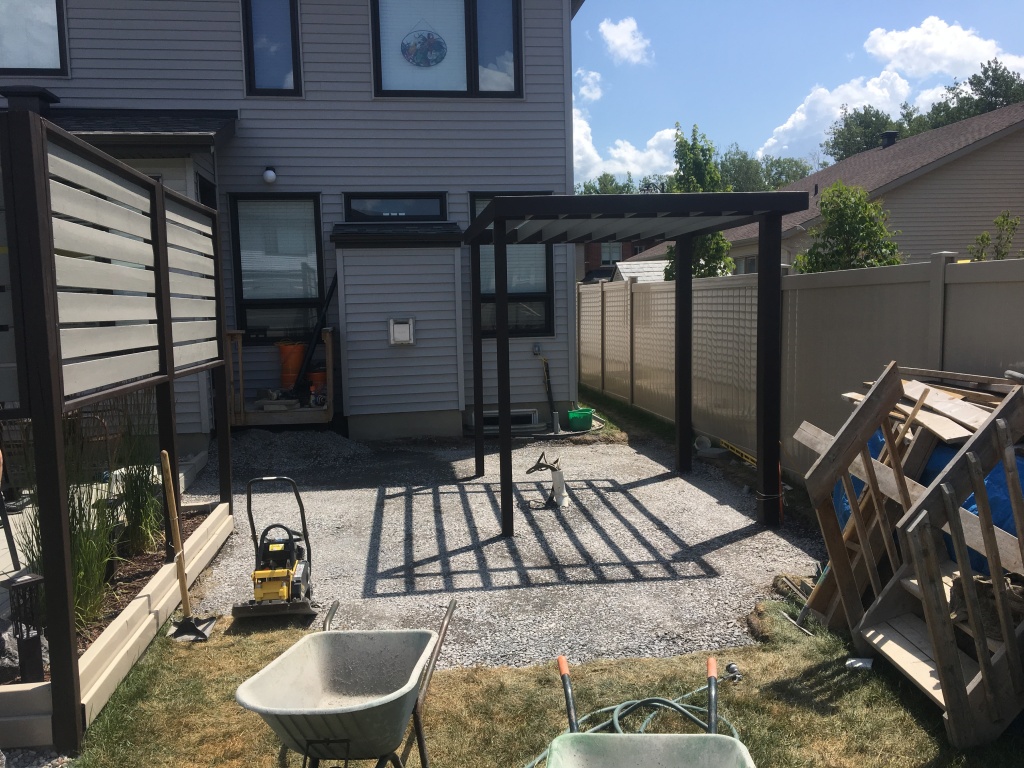
The pergola was something that was designed to be compatible with the layout of the paver stones and was erected post-excavation, but before any base material for the pavers was put down. Two 6″ x 6″ and two 4″ x 4″ posts were used and these pieces were the only lumber purchased new. The auger was used to excavate holes and concrete bases were poured just below the frost line. The canopy was 100% freecycle material, designed to match the privacy screens built in Phase 1 in terms of color and style . All material was pre-painted before installation. I used an 8′ by 8′ perimeter layout for the posts with a 1′ overhang over the sides making the overall canopy 8′ x 10′ in size. It is simple but effective and aesthetic.
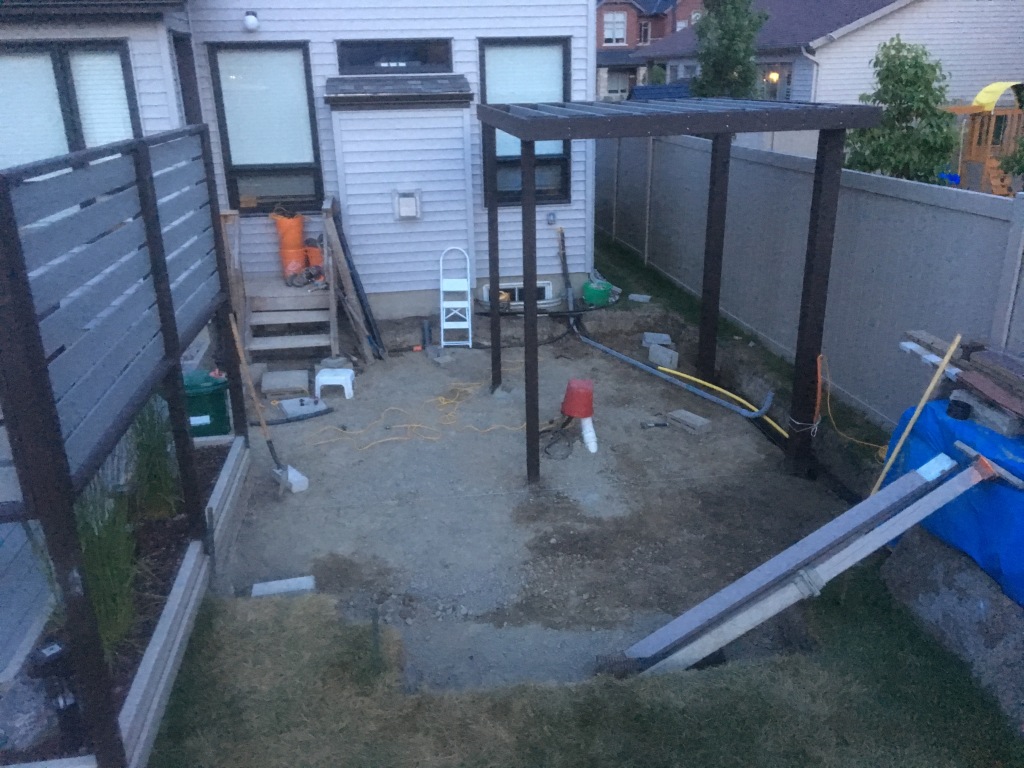
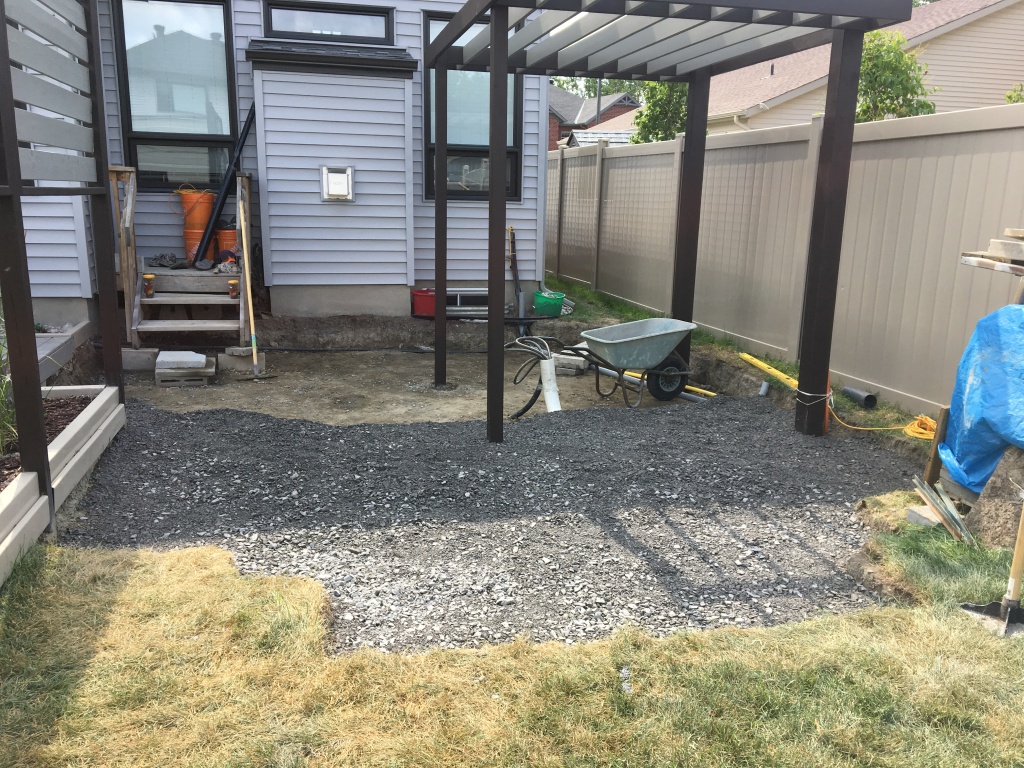
Now that the pergola is erected (minus some additional screening panels to be added later) the rest of the preparatory work is being completed. Conduit trenches are finalized and backfilled with freecycle gravel (small amounts of gravel are always easy to find free, larger ones not so much). The grey conduit in the photo is for the natural gas line which will supply the BBQ and it runs from the gas valve at the house over to the future BBQ stand. It was all freecycle except for the 90 degree bends. I took this photo from the top of a stepladder. A red bucket covers the plumbing elements until they are ready for hookup.
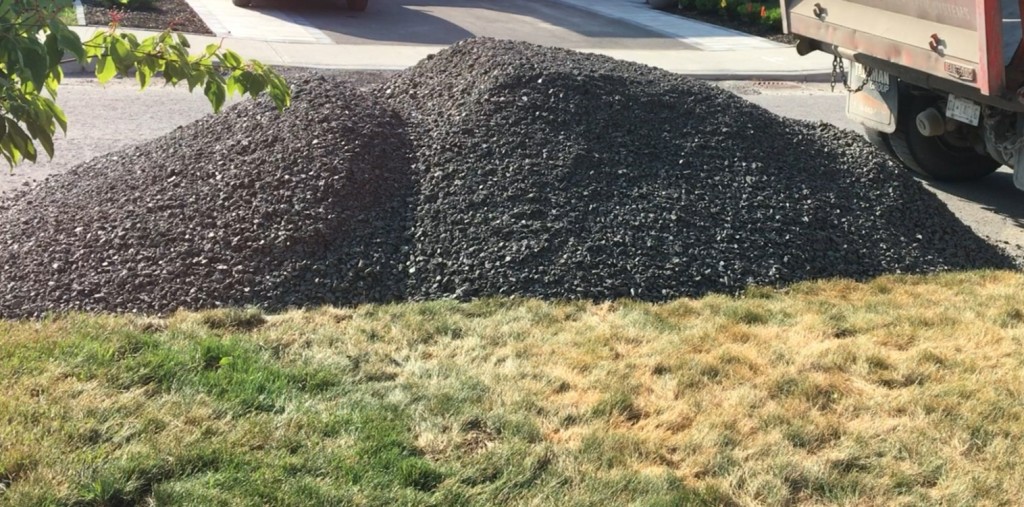
The day arrives when it is time to begin the backfill. This is the pile of granular “A” delivered to the front of the house, fresh off the dump truck. This is 10 cubic yards, about 11 tons or so (the pile was about the size of a typical car). Again, small amounts of gravel are always easy to find free but for this project I needed 10 tons of granular (and a ton of sand in addition) which is an amount that is hard to procure as “used” or freecycle, so I paid for new clean material to be delivered. Over the course of the next 12 hours the two of us would load this in wheelbarrows by hand and take it back into the workzone……..
……. where it would be placed and compacted, using first the hand tamper, then later using a rented vibrating compactor, to the required degree necessary to then receive the sand layer. This was a long, hard day, but eventually the 14″ deep, 300+ cubic foot hole got filled and compacted. This work occured during a week off from the office using “vacation” days in the middle of the July heat and humidity. Doing this is certainly not most people’s idea of a “vacation”. But for us, this is all part of the upcycling, freecycling, DIY journey – nothing ventured, nothing gained.
The end result of the granular backfill. Proper drainage was a priority, as was the strength and integrity of the base, since this base needed to support not just a paver stone patio but also stone islands for the kitchen. Professional landscapers in our area usually excavated no deeper than 6-8″, but we went well over a foot deep and compacted the earth base before putting down the granular. Both the hand tamper and the rented vibrating compactor can be seen on the left. To the right, the stairs and railing to the backdoor have now been been removed and hoarded; a retrofit will be performed once the pavers are finished.
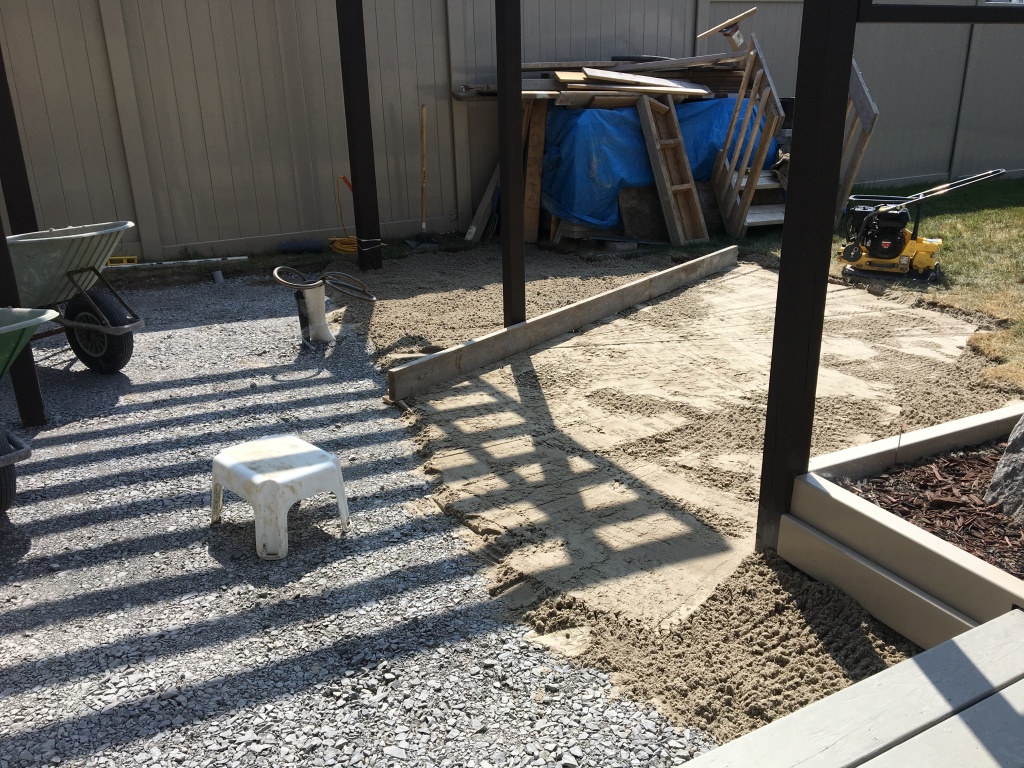
With the gravel now placed and compacted with the vibrator plate machine, the sand can now be brought in and spread, using a long straight cedar beam as a screed to spread the sand out evenly and keep a level surface. It was somewhat tricky to use the screed with the pergola posts being in the way, but the method worked sufficiently to provide a smooth, even surface end to end suitable for placing the pavers. The rented vibrating plate compactor can be seen in the upper right of the photo.
Final grading of the sand layer. The hand tamper is used to get really good compaction at the post edges and to help smooth out the ridges left behind by the vibrating compactor, which was given several runs all over and along the extent of the surface area. There is nothing special about this process, other than the fact that as a DIY’er you need a little more time and effort than the pros who do this day in and day out for a living.

The first of the pavers are now being laid the following day. I procured used pavers from Kijiji from two different sources and although the beige color was not what I originally wanted, after two years of fruitlessly searching I eventually compromised, and it actually looked OK with the vinyl fence and the rest of the color pallette. The dark stones in the foreground were a different size and shape and were therefore used as perimeter stones to create a specific aesthetic.

Once all the uncut pavers are installed, the only two that remain to be installed are those that are propped up against the pergola posts waiting for cutting by the “Chopper”. This layout was designed, in part, to minimize cutting pavers. I specifically designed a layout that would leverage the specific geometry of all the components and fit them together in a unique but symmetrically pattern, by centering the island within both the pergola and the patio. So (paver stone width) x 2 = island width and (paver stone width) x 6 = pergola post offset spacing. The island itself will be on a foundation fully contained within, but not over, a paver joint and the posts will have one edge falling on the paver joint line for easy cutting. It would have been a bummer to need a square hole in the middle of a paver!
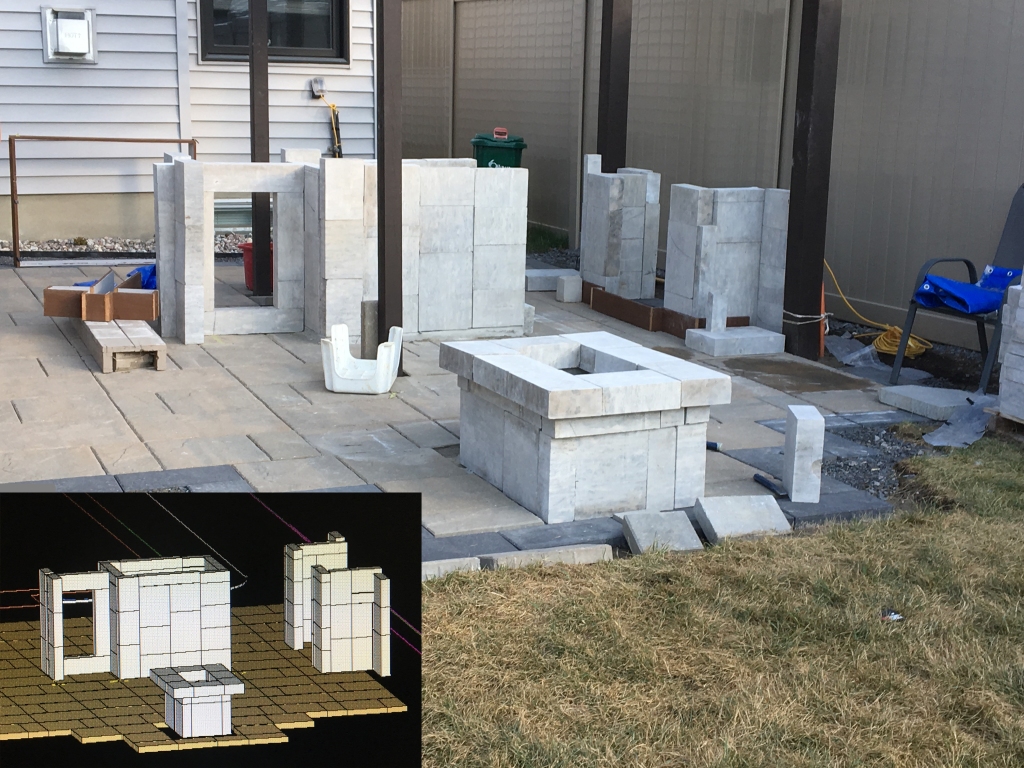
In order to build the kitchen elements from the limestone blocks, I needed to ensure I had the proper blocks in the proper places and could minimize cutting by test fitting all blocks. So I did what I called “dry stacking” the blocks. Using the CAD design, all the different pieces were laid out and organized long before they were trimmed and set in place on poured slabs. On the left you can see 2 wood forms – a crucifix shaped one laying down and a rectangular once against the wall. These were built from freecycle wood and are ready for pouring concrete slabs. The pair of Z-shaped walls located at the larger end posts will surround the BBQ. The fireplace is small but will be a dual purpose (wood/propane) functional unit.

The freecycle wooden forms are seen containing poured concrete in this set of photos. There are a total of four slabs to pour – two for the island, one for the BBQ station. and one for the firepit. The firepit would simply utilize a void in the pavers for its slab pour; no form needed. The blocks are de-stacked and kept aside (numbered by column and row), while each slab is poured and left to cure. I used fibreglass additives in the concrete for extra reinforcing. Once the initial cure was complete (7 days) the blocks are re-stacked on the slabs. These slabs were required as the pavers are installed with a sloped grade for drainage (about 2% or so), while the kitchen, BBQ and fireplace elements needed to be built perfectly level.
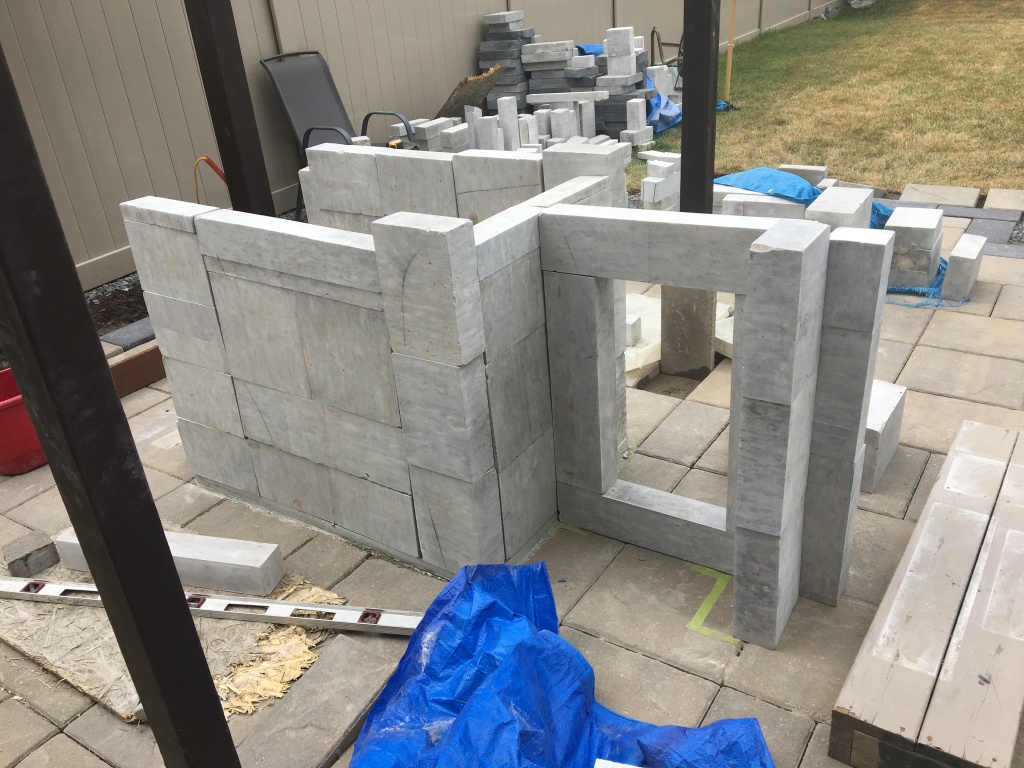
In this photo the rectangular slab is poured and cured but the crucifix-shaped one is yet to be done, although the spine is dry stacked. I’m dry stacking blocks for each segment in order to test different block positions (flaws/chips can face the inside) and then to mark all the cuts needed for the chop saw. The size and shape of some of the longer pieces allowed this design which minimized the amount of stone needed to support the 7′ countertop, and the design also provided an aesthetic cut out with under-countertop space to seat 3 people.

This picture shows the result after the final assembly of all the cut limestone pieces, secured using heavy duty construction adhesive instead of mortared joints. The machine used to do all the cutting is parked underneath the blue tarp, but it is shown in the lower right panel. Its an older 2-stroke Honda gas powered chop saw with masonry blade with a sliding base that mounts on its own stand, and when used properly it provides excellent and precise wet cutting. A metal straight edge and square are used to get all surfaces aligned, square and flush when applying the adhesive, and by using stone dust chips and/or wood shims where needed, the end result is a perfectly square and aligned kitchen island, firepit and BBQ station. Grout is still to be added in the joints to finish it off. It looks just the CAD model at this point, notwithstanding the small spine extension (lower left panel); and notice the island’s symmetry with the pavers (upper right panel).

Now that the island stonework is complete, I have begun to gather, cut and pre-assemble all the freecycle bits and pieces needed to plumb in the freecycle stainless steel double sink (shown in lower left panel). For this build, I elected to run only cold water from the exterior tap (see Phase 1) to the sink; so the hot water side of the faucet needed a pressure cap and shutoff valve. This sink also came with a faucet sprayer that I kept as part of the assembly. The sink’s purpose was actually a) to fill up the precut hole in the countertop, and b) to be useful for cleanup and food preparation for BBQing. If hot water is needed, the BBQ has a stovetop element to heat a pot of water. The water line detaches to allow blow-out of the taps for winter shutdown.

Finally time for the countertop install! The heavy, 7′ long granite countertop is carefully pulled out of the garage and hauled to the backyard for installation, laying sideways on a towel ready to be lifted once adhesive is applied (lower left insert). Moving, lifting and placing this countertop into position was a 3 man job. Some thin stone shims were pre-cut to use for final levelling, specifically along the spine. The final positioning needed to be precise since there is only a 1/2″ overhang along either side of the island base. It had to be placed accurately before the adhesive set, in order to look just right.
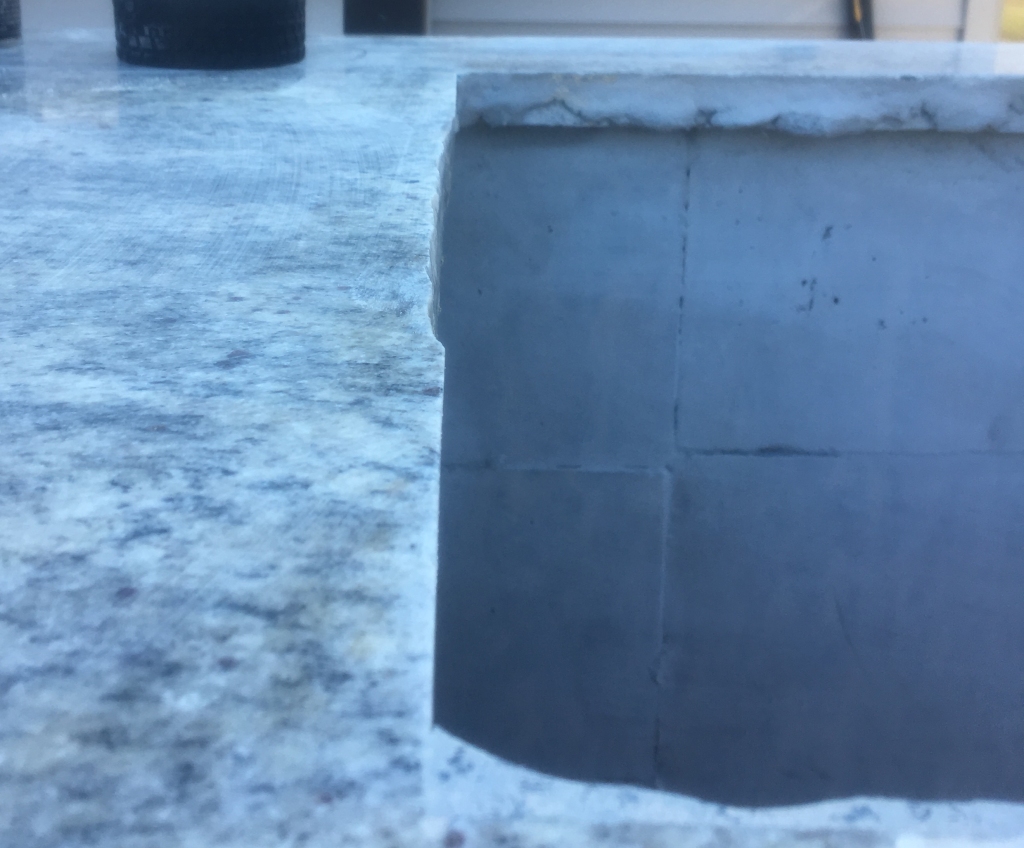
Nothing in life is perfect, and this was the case with the countertop’s opening. It was just slightly too narrow width-wise, and just slightly to short, depth-wise, for the largest stainless steel sink I could find freecycle. But by carefully grinding with a skill saw outfitted with a masonry blade, I widened the edges just enough to be able squeeze the side of the sink into the hole – see the grinded-out edge in upper part of the photo. Also shown along the bottom edge of the photo is the repair done to close the small gap. Using a smooth grout on top of a temporary wood form propped underneath the countertop, I created an edge extension and actually used two different coloured paints to mimic the granite’s marbled pattern. The front and back gap were less than 1/8″, so its not noticable in the finished product, but look closely and you can see the filled section in the corner and along the front edge in this photo.
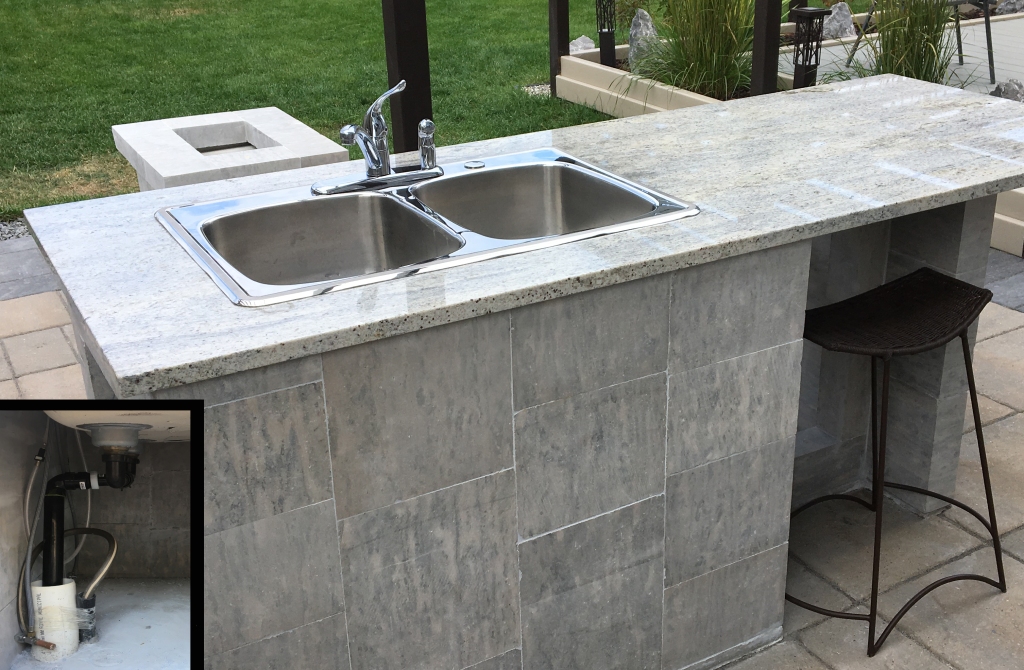
A look at the final product once the sink is installed in the countertop. The small lower left panel shows the connections underneath. The tap unit has a sprayer and both sinks drain into a common pipe leading down to the previously installed sanitary connection. Water is supplied through conduit from the exterior tap to the sink. In this photo you can also see the stonework has all been grouted and there is a recycled barstool with legs cut to the correct height to allow it to slip underneath the countertop and sit against the spine of the island ready to be pulled out for use (there is one on each side).
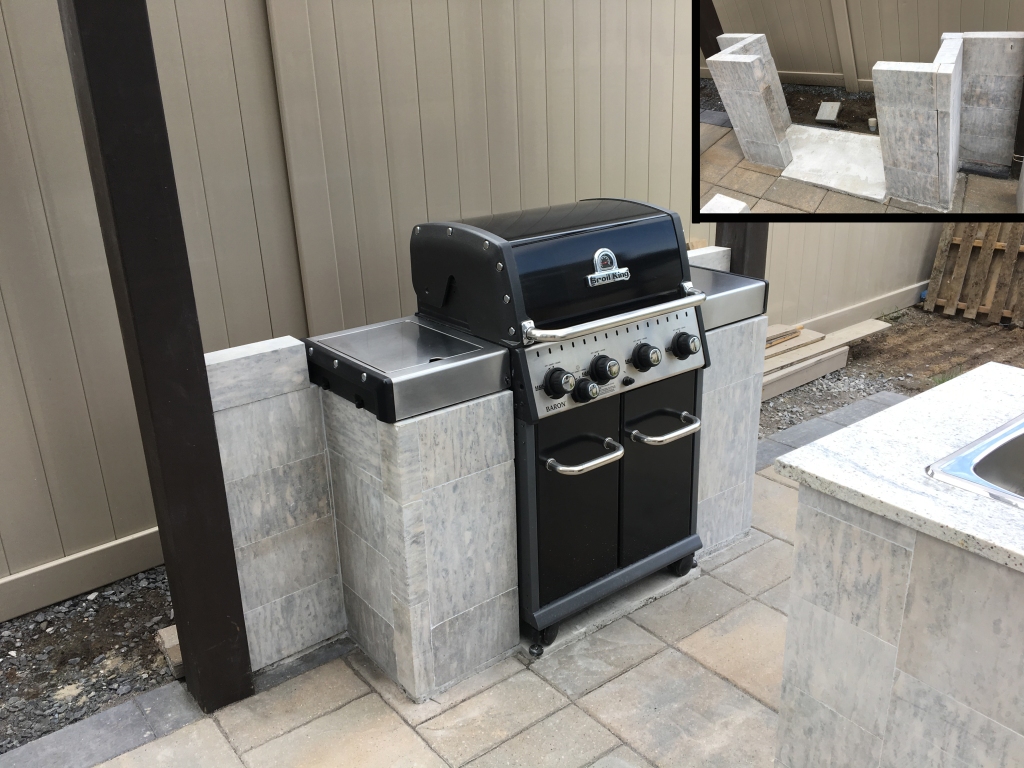
The (nearly) finished product for the BBQ island; the only thing missing in this photo are the white marble top caps that will be secured later to the top of the end walls, and the cover the BBQ came with. This natural gas BBQ was one of three models I considered buying new for this build; but I was able to find this two year old one in the used market in exceptionally clean and pristine condition for just under half the price of a new one. Just like the island, both the limestone blocks and the BBQ sit on a level concrete pad formed and poured specifically to fit the BBQ (see the upper left panel). In this panel photo, just behind the slab, is the conduit installed to receive the natural gas line from the house to the BBQ. This BBQ can lift right up and off the stone station for winter storage. The cover has its side seams cut to allow it to drape over the extended wall.

The fireplace unit is small but has cinder block firewall inserts allowing it to actually burn wood should we wish to do that. But we found a small rectangular propane unit (on sale) designed to sit in the umbrella hole of an outdoor table, so I then found some freecycle black metal flashing sheets and designed and built a surround pan for it that was the same size as the opening. The entire unit simply drops in and lifts out with the bottle attached.

The freecycle fountain was an afterthought, only because I managed to have enough leftover material to piece together this small monolithic unit as a functional, decorative feature. A small freecycle electric water pump, some hose and pipe pieces, spillways cut from the vinyl fence rail leftovers, some freecycle paver cut-offs, a piece of pond liner, some cement, gravel, and some limestone shatter rock from a nearby field was all it took to build it. There is also a freecycle handhole and conduit for the plug and extension cord (buried) that lead back to the electrical outlet on the backside of the 6×6 pergola post (an outlet location that also allows powering a BBQ rotisserie). It fills with rainwater through an hidden underground inlet (but can also be topped up with a hose) and the top is removable to lift the pump assembly out over winter.
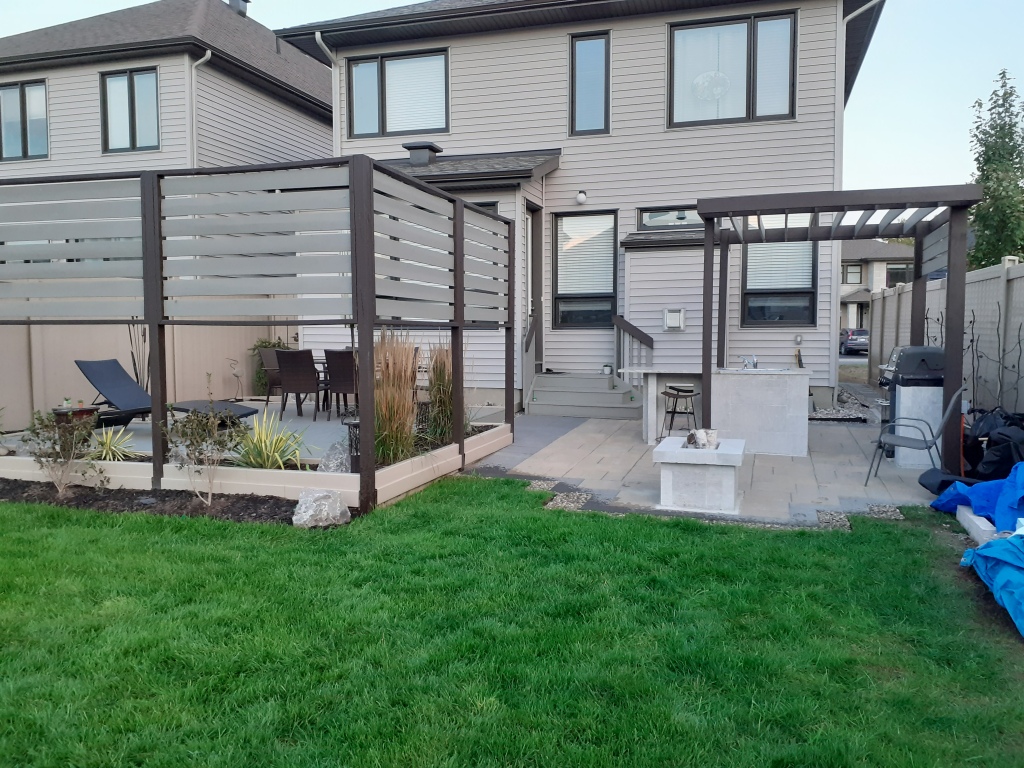
The overall finished product of both the Phase 1 and Phase 2 build, looking from the end of the backyard towards the house. The original risers and railings from the backdoor steps have been salvaged and painted, and new bi-directional perimeter steps have been built out of Phase 1 deck leftovers (center of photo). The steps that face alongside the house give me a nice straight “beeline” from the backdoor of the house to that BBQ!
Pretty decent outdoor kitchen and patio for just over $1700 for all components, BBQ included! (Some folks spend that much on just their BBQ!)
Have any questions or want more information about this build? Send me a message in the contact link and I’ll be happy to provide a response.

Love the design elements being used here. There is an elegance in the simplicity! My wife and I are building a house next year and I’m thinking I might be able to incorporate some of the ideas into finished hardscape.
Cheers from Nova Scotia!
RiNS
LikeLike